Table of Contents
Introduction
How many times have you watched a video with a fantastic piece of music on it? Wouldn’t it be great if you could make it an MP3 file to play on your computer, or MP3 player? Easy Audio Extractor is one of great selection of audio extraction tools that you can use to make your own MP3s from video clips.
Step 1. Input Video Files
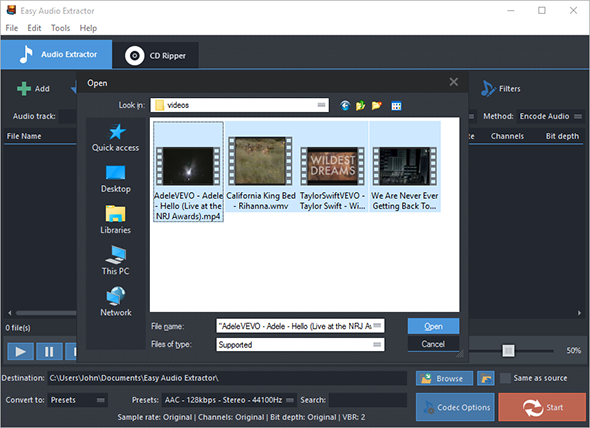
Click “Add” and 3 ways can be applied to add video file: “Add Files” is for one or more video files; “Add Folder” is for the folder containing video files; “Add Folder Tree” is for the folder along with its subfolders. To delete them from the list by “Remove”/”Clear”.
Tips: All the files will be listed in order of input by default. If you need to arrange the files in order, just use the “Up” & “Down” buttons to move it up and down in the list.
Step 2. Choose Quality Presets & Codec
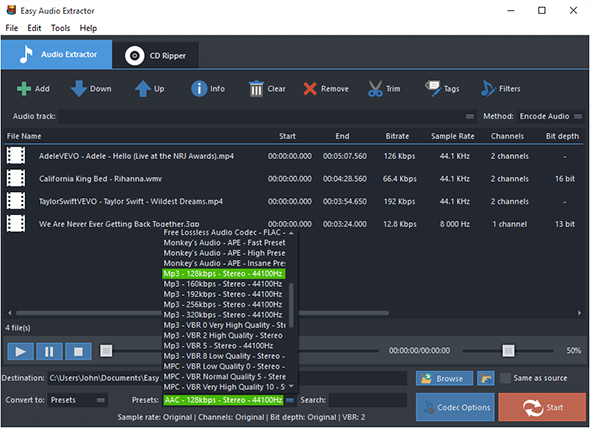
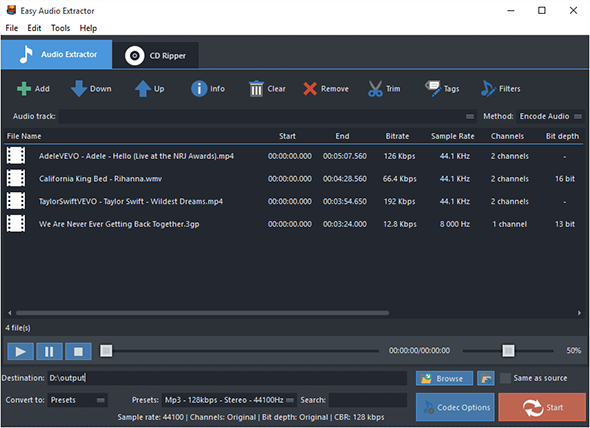
In the menu of “Convert to”, select one conversion type from “Presets” and “Codec”. If “Presets” has been chosen, you will see a whole list of quality presets in the dropdown menu of “Presets”. Choose the one that best suits your needs. To adjust codec settings, click “Codec Options”. To specify effects and filter settings, click “Filters”. After that, click “Browse” to choose an output folder for the converted video files or check “Same as source” to save them in the source folder.
Step 3. Start Extraction
Now, start audio extraction by clicking “Start”. After conversion, you can click “Open” to open output folder to find the converted files.
Step 4. More Features Available
There are more advanced and convenient features that may make your work easier:
To trim audio in audio trimmer, click “Trim”;
To rip audio from CD, go to “CD Ripper” tab;
If there are needs to make all your audio files a well tagged collection for easier playback, click “Tags” and you can edit audio tag including artist, album, performer, genre, date, etc.;
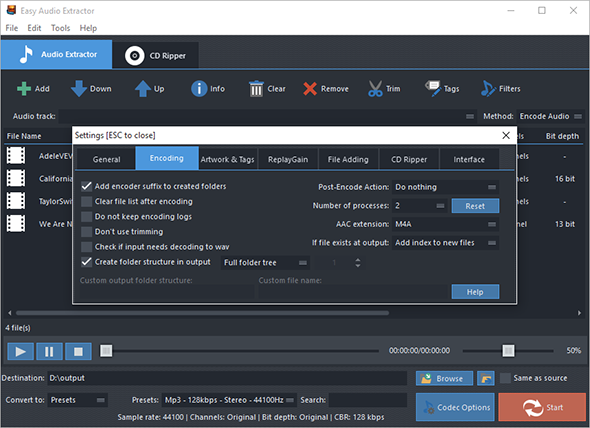
For more detailed settings of various features, click “Edit – General Settings”:
General – check updates, register shell extension, choose temp folder and play reminder sound, check logs, etc.;
Encoding – set max parallel conversion processes allowed, enable trimming, keep logs, add encoder suffix, choose overwrite settings, etc.;
Artwork & Tags – extract artwork from audio or embed artwork to audio, resize artwork, copy tag, write tag, etc.;
ReplayGain – choose ReplayGain settings, prevent clipping, copy to lossless output from lossless source, etc.;
File Adding – use file length filter and format filter to filter out certain file types, use MediaInfo to read tags, etc.;
CD Ripper – enable jitter detection, enable paranoid mode, specify freedb server and user email and download album cover;
Interface – make the app always on top, show extra columns in file list and show text in toolbar buttons.